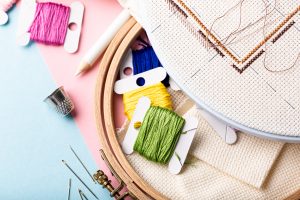
 Imagine this: you’re curled up on the couch, a cozy blanket over your lap, your favorite show humming in the background. In your hands? A tiny piece of fabric slowly filling with colorful X’s like pixels coming to life. That’s cross-stitch: equal parts art project, stress relief, and creative therapy.
It’s sort of like coloring with thread and it’s one of the easiest ways to dip your toes into embroidery. This beginner-friendly stitch is a great way to create something unique and rewarding. Every tiny stitch adds up to something beautiful, and before you know it, you’ve turned a blank square of fabric into a mini masterpiece. And with the holidays coming up, there’s no better time to jump in to learn something new and start stocking up fun, low cost gifts! Whether you’re stitching a spooky Halloween motif, your favorite Star Wars quote, or a cozy Hobbit-hole scene, cross-stitch is one of those hobbies that feels as relaxing as it is rewarding.
Here’s how to jump in:
What You Need
- Cloth: Generally, aida is the easiest to use when learning. It comes in various “counts” meaning holes per inch. “14 count aida” means there are 14 holes (or squares) per inch of the fabric. The higher the count, the smaller your stitches will be.
- Needle: Use a blunt tapestry needle so you won’t accidentally pierce the fabric (or your finger!). There are different needle sizes but you can try them out and see what you prefer.
- Embroidery floss: Typically, your pattern will tell you what color floss/thread you need and how many skeins. A skein is a bundle of loosely twisted strands of thread, wound into a looped shape or wound around a reel. Looped shaped “pull skeins” are common when looking for floss for cross-stitch.
- An embroidery hoop: Embroidery hoops are great for keeping your fabric in place while you’re stitching. Plus, they can double as a frame for your finished piece!
- A pattern (PDF or printed chart)
- Small scissors
How to Start
- Pick a fun, small pattern – There are ton of free options online or check your local craft store for patterns and/or starter kits.
- Find the center of your fabric (fold in half twice) and match it with the center mark of your pattern.
- Thread your needle — usually use 2 strands out of the 6 in the floss for most patterns (unless they tell you otherwise).
- Make your first stitches: Think of each stitch like a box – two holes at the top, two at the bottom.
- Starting at the center of your pattern and fabric, bring your needle up from the back bottom left corner. Leave a tail an inch or two long on the back.
- Bring the needle down at the top right corner.
- Bring the needle up at the bottom right corner, while stitching over the tail on the back to secure the thread.
- Bring the needle down at the top right corner.
- Continue this for a few boxes or until your pattern tells you to stop. You’ll end up with lines going all in one direction like / / / / / /
- Then go back the other direction. Bring the needle up from the back but from the bottom right corner.
- Bring the needle down at the top left corner.
- Continue until you reach the last box. You’ll end up with a row of neat X’s!
- Be consistent! What direction you stitch in or if you prefer to do complete Xs is up to personal preference but it’s easiest to keep it consistent throughout your project.
- Keep stitching! If you’re working on a row of X’s of the same color, it’s most efficient to stitch them in rows from left to right, top to bottom.
- Finishing: To finish off a piece of thread, secure it by running your needle under three stitches on the back of your work. Snip off the excess thread.
Why it’s perfect for beginners
- Mistakes are typically easy to fix — you just “un-X” a few stitches and redo.
- You see it grow square by square, so the satisfaction builds fast.
- There are so many pattern options out there! You can find something for anyone.
- It’s portable — grab a hoop and you can stitch while watching a show or relaxing in a cafe.
If you’re ever uncertain about your stitches as you’re learning, feel free to check out the step-by-step photos here to check your progress!